Making a cardboard loom is a great way to customise what size of loom you would like. It also means you can reuse different types of packaging material such as shoe boxes, cereal boxes and any types of card that will be strong enough to hold the warp. If using thinner card, you could glue a couple of pieces together to create a stronger base to weave on.
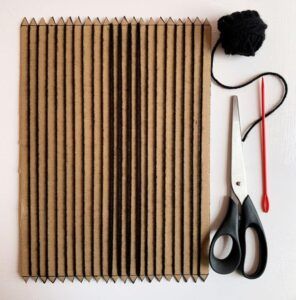
Cardboard loom
Cardboard loom instructions
You will need:
– Strong card – Scissors
– Ruler – Tape
– Pen – Yarn for the warp
Step 1
Draw a line 1cm from the edge on the top and bottom of the card.
Step 2
Make a dot every 1cm marking along the lines you have just drawn, then make a make a dot every 0.5cm along both outer edges of the top and bottom of the card.
Step 3
Join the dots to make a zig zag, and cut out all the triangles where the flat base runs along the outer edge of the card. You could colour the triangles you have to cut out to make it easier to see. This will leave gaps/dents that are evenly spaced for your warp.
Step 4
Warp up the loom by taping the yarn to the back and wrapping the yarn around the loom, slotting the yarn into each of the gaps that run straight up and down from each other.
Weaving tip:
Wrap the yarn around the loom once per dent for a more ‘gappy’ weave, and twice per dent for a tighter structure. Why not try a mixture of both on the one warp to see how different patterns can look by changing the warp spacing?